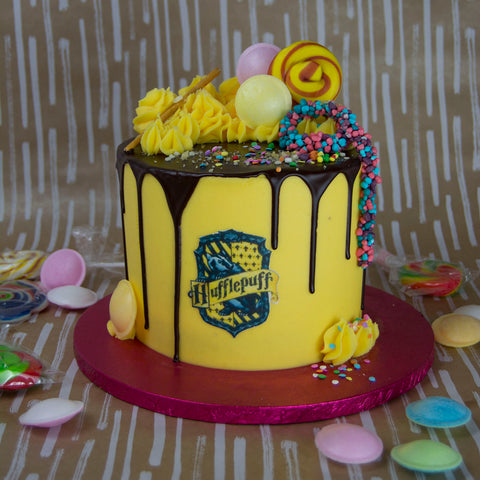
Harry Potter Cakes!

My favourite part of my job as a cake maker is dreaming up new designs and new flavours. If I have a week that is particularly quiet on orders, I use that as an opportunity to bake and design new cakes that might end up available to order via my website, or maybe something that is just for fun that I use for an instagram post.

I absolutely love the Harry Potter books and films - I've been reading and re-reading them since I was a teenager and watch the films at least once a year. I have wanted to bake a Harry Potter cake for years, but until now wasn't quite sure what I would bake. Baking a cake for each Hogwarts house so that you can either choose your official cake, or maybe buy one of each for a bigger celebration. I'm officially in Hufflepuff and proud of it!
You can check them out in my online shop here: https://www.catfoodcakes.com/collections/kids-birthday-cakes

The design process starts by researching other Harry Potter themed cakes on Instagram, Pinterest and Google images. I make a mental note, and sometimes a sketch on parts of each cake that I like, and try to bring those ideas together and work with my own skills and style. I love drip cakes as I find they just finish the cakes off beautifully, and the ganache always compliments the flavour.
Not only did I design the cakes to look like the Hogwarts houses, I tried to match a flavour to each house! The Gryffindor cake was butterbeer, the Hufflepuff cake was vanilla funfetti with bubblegum and nerds, the Ravenclaw cakes was a classy chocolate and raspberry, and the Slytherin cake was matcha green tea.
I based my recipe for the butterbeer cake on my own experience at Harry Potter Studios in Watford. It's a sweet, creamy caramely flavour - which I LOVE! I baked the cake with actual cream soda (I love baking with pop!) and filled with marshmallow fluff and my home made caramel sauce. You can try this recipe at home either in your own layer cake or even in a traybake or cupcakes.
Recipe for 8" diameter Butterbeer layer cake. (Divide in half for cupcakes or a shorter/smaller cake)
Ingredients
500g Butter
375g Light Brown Sugar
125g Dark Brown Sugar
8 Large Free Range Eggs
500g Self Raising Flour
1 tsp Bicarbonate of Soda
100ml Cream Soda
Buttery Caramel Flavouring (or Vanilla Extract)
Marshmallow Fluff - one tub.
Caramel Sauce - either homemade or shop bought.
Buttercream frosting (I used 1000g butter + 1500g icing sugar, with vanilla and food colourings)
White Chocolate ganache (100g white chocolate, 50g double cream)
Edible Gold Paint
Method
1. Preheat your oven to 160 celcius (fan). Grease and line 4 x 8" diameter cake tins.
2. Mix your butter and sugar on a high speed in a stand mixer for 5-6 mins, longer with a hand mixer. It's important to make sure that you spend a long time making sure you achieve a fluffy buttercream at this stage to make the best sponge!
3. Add the eggs one at a time, don't overmix.
4. Add the flour and bicarbonate of soda, and the flavourings if using. Mix slowly until fully incorporated. Scrape the sides of your mixing bowl to make sure you have mixed in all of the butter so your cake doesn't burn or have big holes.
5. Add the cream soda, mixing until fully incorporated. Divide the mixture evenly between the 4 tins and pop them into the oven as quickly as possible!
6. Bake for 25-30 mins, I use a palette knife to check that the sponge has baked all the way through. Once baked, leave the cakes to cool for a couple of hours (I ususally use that time to make the buttercream, decorations, or make even more cakes!)
7. Prepare your buttercream frosting, fillings, decorations and toppings.
8. Level your sponges, and stick the bottom sponge to your cake board with a little buttercream frosting. Fill with buttercream, a big scoop of marshmallow fluff (so sticky!) and a generous helping of caramel. Spread around the surface of the cake to make sure every mouthful is sheer butterbeer joy! Repeat until you have a very impressive tall cake.
9. Crumb coat the cake with buttercream - this part can be messy, as nobody will know, but it is important to try your best to make sure your cake isn't leaning to one side. Pop the cake into your fridge for 30 minutes, or 10 minutes if you have space in your freezer.
10. Colour your buttercream in Gryffindor colours (or Hufflepuff, you know, whatever...!) I was very lucky to attend art school for 4 years, and one of the only skills I use now in my job is colour matching, so I used a mixture of 4 colours to achieve the maroon/rich red colour, and the contrasting golden yellow. Cover the cake in more buttercream! Use a bench scraper to achieve smooth sides and a level top for your cake.
11. White chocolate ganache is just melted white chocolate mixed with double cream (you can use melted dark chocolate and butter instead if you don't want white chocolate). Test one spoonful of this on the cake before pouring it all on, to make sure that it isn't too hot/too cold. Set this in the fridge or freezer before painting it gold.
12. Add Hogwarts decorations! I love the cute pretzel magic wand, and the golden snitch I made for this! Be creative, and make your own design. Please instagram it and use the tag #catfoodcakeschallenge for an opportunity to win a prize.
13. If you have failed, or would rather I bake the cake for you, you can order one in my online shop here: https://www.catfoodcakes.com/collections/kids-birthday-cakes/products/gryffindor-cake


